PROFESSIONAL & IMPARTIAL

jeremy 21:06:2016

Labels

Showing posts with label video. Show all posts

Sunday, January 10, 2016

Português - JEREMY THOMAS -- SOBRE O ESTUDO DE ANOMALIAS --- TRÊS PASSOS FUNDAMENTAIS PARA EFECTUAR A OBSERVAÇÃO SISTEMÁTICA DE ANOMALÍAS

JEREMY THOMAS TUTORIAL


SOBRE O ESTUDO DE ANOMALIAS:

A realidade de objectos anómalos  e autónomos a voar na atmosfera, abreviadamente anomalías, está apoiada por uma quantidade considerável de dados de observações coerentes.

Três etapas  simples e fundamentais para a observação sistemática anomalias:


1 – Localização por meio de infra vermelhos – as anomalias deslocam-se habitualmente em distâncias que estão para além da observação a olho nu.
2- O uso de equipamentos de elevada ampliação óptica capazes de resolver/salientar os detalhes de objectos distantes.

3- Sinalização directa dirigida para as anomalías localizadas. As anomalías irão responder a sinais "inteligentes" alterando o seu comportamento e a  forma geomeétrica do corpo.

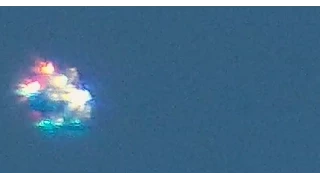
Algumas anomalias comportam-se como seres vivos e são intrinsecamente polimórficas / metamórficas.


A negação contínua dessa realidade pela "comunidade científica" pode ser considerada como o maior erro concebido pela Ciência Oficial da História Moderna.

Como disse o grande matemático alemão David Hilbert:


Wir müssen wissen. Devemos saber.

Wir werden wissen. Nós saberemos.

JT.


TRÊS PASSOS FUNDAMENTAIS 
PARA EFECTUAR A
 OBSERVAÇÃO SISTEMÁTICA DE ANOMALÍAS


0.00 - Três passos chave para observar anomalías

0.07 –Os três quesitos fundamentais e necessários, para ser capaz de observar sistematicamente as anomalias são:

1- A localização através de Infravermelhos.

2 – Uma ampliação óptica elevada para ser capaz de resolver/descrever um objecto distante em todos os seus detalhes 

3 – Sinalização directa activa.

A seguir, irei explicar cada passo com mais pormenores.


0.37 – 

1- A localização através de Infravermelhos.

Toda a experiência de observação acumulada demonstra que, quase todas as anomalias são visíveis a olho nu, se estiverem suficientemente próximas à semelhança de qualquer outro objecto “normal”, mas, quando está para além de certa distância, na atmosfera e à luz do dia, serão mascaradas pela luz visível espalhada no céu. Muitos objectos pequenos que se encontram na atmosfera, quando estão relativamente pouco afastados,  não são visíveis a olho nu, tais como insectos, aves pequenas, etc. Mas quase todos serão lcalizados através de um sistema de infra vermelhos.

Saturday, January 9, 2016

Castellano -- JEREMY THOMAS --TRES PASOS CLAVES PARA LA OBSERVACIÓN SISTEMÁTICA DE ANOMALÍAS -- Video +Transcript/Translation


JEREMY THOMAS TUTORIAL


ACERCA DE LAS ANOMALÍAS:

La realidad de los objetos voladores anómalos autónomos en la atmósfera, o sea las anomalías, es apoyada por una abrumadora cantidad de datos observacionales consistentes.

Tres pasos claves para la observación sistemática de anomalías:

1- Detectadas con el infrarrojo. Las anomalías se mueven generalmente más allá de las distancias que se ven a simple vista.

2- La utilización de equipos de gran ampliación óptica capaces de resolver los detalles de los objetos distantes.

3-Señalización directa de las anomalías detectadas. Las mismas responderán a las señales "inteligentes" que cambian su comportamiento y su geometría de cuerpo. Miren esto: https://www.youtube.com/watch?v=QeAbuBsYP5c

Algunas anomalías se comportan como seres vivos y son intrínsecamente polimórficas.

La negación continua de esta realidad por la "comunidad científica" puede ser considerada como el mayor error jamás realizado por la ciencia oficial de la historia moderna.

A medida que el gran matemático alemán David Hilbert dijo:

Wir müssen wissen, debemos saber,
Wir werden wissen. Lo sabremos.


 JT.


TRES PASOS CLAVES PARA LA OBSERVACIÓN SISTEMÁTICA DE ANOMALÍAS:


Tres pasos claves para la observación sistemática de anomalías
0.00 --Three key steps for systematically observing anomalies.

0.07 – Los tres pasos/puntos claves, básicos y necesarios para poder observar sistemáticamente a las anomalías son: 
0.07 –The three basic key steps/points needed to be able to systematically observe anomalies are:

1- Detectado con el infrarrojo.
1- Infrared Spotting.

 2- Alta magnificación óptica para poder identificar un objeto distante con sus detalles.
 2- High optical magnification to be able to resolve a distant object in its                        details.

3- Señalización directa activa.
3- Active direct signalling.

English -- JEREMY THOMAS -- About Anomalies --Three key steps for systematically observing anomalies.

JEREMY THOMAS TUTORIAL


Best viewed in HD. Redland FL 33187.


ENGLISH
SPANISH
PORTUGUESE


ABOUT ANOMALIES:


The reality of autonomous anomalous flying objects in the atmosphere, anomalies for short, is supported by an overwhelming amount of consistent observational data.

Three simple key steps for systematically observing anomalies:

1- Infrared spotting, anomalies move usually beyond naked eye spotting distances.

2- The use of very high optical magnification equipment able to resolve the details of distant objects.

3- Direct signaling to the anomalies spotted. Anomalies will respond to "smart" signals changing their behavior and body geometry.
Watch this: 
https://www.youtube.com/watch?v=QeAbuBsYP5c


Some anomalies behave like living beings and are intrinsically polymorphic/shape-shifters.

The continual denial of this reality by the "scientific community" can be considered as the biggest blunder ever done by Official Science in modern history.

As the great german mathematician David Hilbert said:

Wir müssen wissen, We must know,

Wir werden wissen. We will know.


JT.


THREE KEY STEPS FOR SYSTEMATICALLY OBSERVING ANOMALIES

0.0 – Three key steps for observing anomalies

0.07 –The three basic key steps/points needed to be able to systematically observe anomalies are:

              1- Infrared Spotting.

             2- High optical magnification to be able to resolve a distant object in its                        details.

              3- Active direct signalling.

I will be explaining each one of them next in more detail.

0.37 – 

              1- Infrared spotting:

Wednesday, January 6, 2016

Romîna -- JEREMY THOMAS -- Sistemul Optic Duplu pentru Observatie Nocturna - Video de Instructiuni


Sistemul Optic Duplu pentru Observatie Nocturna


Please Translate and Spread.
Your translations will be posted here. 
Kindly send them to

luisavasconcellos2012@gmail.com


Sistemul Optic Duplu pentru Observatie Nocturna
 Dual Optical System for Nighttime Observations


0.08 - Obiectivul unui sistem ca cel descris în acest video este de a fi capabil sa "rezolve" detaliile obiectelor distante. Multe filmari nocturne contin doar puncte de lumina, însa nu exista detalii de structura în spatele punctului, si nu întotdeauna este oferita. Fara detalii de structura, este într-adevar imposibil sa se faca o "identificare" bazata pe o anumita informatie sau experienta, a obiectului în observatie.
0.08 – The goal of a system like the one described in this video is to be able to “resolve” the details of distant objects, many nighttime footage contains just dots of light but no structure details behind the dot is ever provided, without structure details is really impossible to make an educated “identification” of the object under observation.


De multe ori, chiar cu structura detaliata, este foarte dificil sa se procedeze la o identificare clara. Multe filmari la lumina zilei sunt un exemplu de acest lucru.
Many times even with full structure details a clear identification it is very hard to make, many daylight footage are examples of that.

0.37 - Optiunea #1: Lentila camerei din dreapta, este localizatorul, o camera de "siguranta" modificata. Nu exista filtre pentru a permite ca, cantitatea maxima de lumina sa atinga sensorul camerei. În acest caz, este o camera LG LCB5100, si o lentila motorizata 16-160mm.
0.37 – Option # 1: The camera lens of the right is the spotter, a modified “security” camera, no filters to allow maximal amount of light reach the camera sensor. In this case is a LG LCB5100 camera and a motorized 16-160mm lens.

1.07 - Telescopul camera din partea stînga este "acel care rezolva", în acest caz, un Calestron cu lungimea focala de 2000 milimetrii, o lentila obiectiva de 120 milimetrii, si o camera IP 5 megapixeli, care foloseste optiunea "de a trage noaptea". Se recomanda uzul de Telescoape cu deschidere înalta.
1.07 – The camera telescope on the left is the "resolver", in this case a Calestron 2000mm focal length, 120mm objetive lens and a 5megapixels IP camera using the "night shot" option. Telescopes with high aperture are recommended.

1.38 - Exemplo de obiectiv vazut de localizator.
1.38 – Example of object seen by the spotter

1.48 - Obiectul anterior "rezolvat"de "cel care rezolva"în acest caz, o anomalie de "strat dublu".
1.48 – The previous object "resolved" by the "resolver", in this case a "double decker" anomaly.

2.04 - Optiunea #2: Vom folosi o generatie de 18 milimetrii, 3 intensificatoare de imagine. Folosind intensificatoarele de imagine în partea localizatorului, si dupa aceea, în partea "celui care rezolva", marim sensibilitatea la lumina a sistemului, în diferite scale de marime.
2.04 – Option # 2: We are going to use 18mm generation 3 image intensifiers, by using image intensifiers in the spotter part and then in the resolver part we are increasing the light sensitivity of the system by several orders of magnitude.

 O data ce lentila folosita are c-montari, atunci avem nevoie de a furniza dispozitive de legatura *c-montaj, pentru intensificatorii de imagine utilizati.
Since the lens used have c-mounts then we need to provide *c-mount connectors to the image intensifiers used.


2.33 - Montaj-c si anex/involucru/enclosure pentru a intensifica imaginea.
2.33 – c-mont connector and enclosure for the image intensifier.

2.49 - Involucru/enclosure intensificator de imagine mx-11769. Sistemul duplu poate folosi unul sau doua din aceste intensificatoare.
2.49 – Image intensifier mx-11769 inside enclosure, the dual system can use one or two of these intensifiers.

3.04 - Acesta este modul de a fixa involucrul intensificatorului de imagine a unei lentile de montaj-C si o camera pentru a obtine imagini ale intensificatorului de imagine, de la fereastra sa de output.
3.04 – This is how you connect the image intensifier enclosure to a c-mount lens and a camera to get the image intensifier images from its output window.

''*C-montaj sau montaj-C, este un tip de lentila gasita în mod frecvent în:
Camerele de filmare de 16mmm, camerele de televiziune de circuit închis, camerele de machine-viziune, si tuburile de fotografiat microscopice.
¨*a C-mount is a type of lens mount commonly found on 16mm movie cameras, closed-circuit television cameras, machine vision cameras and microscope phototubes.


A citi mai mult în/More available at
https://www.youtube.com/user/MiamiUFO/videos

Transcriber: Maya Benmergui
Traducere Romîna: The Light Journalist


Romîna --JEREMY THOMAS - Anomalie intermitenta 27/11/15 4:25pm EST. - VIDEO

Flashing anomaly 11/27/15 4:25pm EST


Please Translate and Spread.
Your translations will be posted here. 
Kindly send them to

luisavasconcellos2012@gmail.com


Anomalia intermitenta 27/11/15   4:25pm EST
Flashing anomaly 11/27/15 4:25pm EST

0.00 - Anomalie localizata pe infrarosu, observati pulsatiile sale stralucitoare caracteristice.
0.00 - Anomaly spotted in IR, note its characteristic glowing pulsations.

0.20 - Segmentul anterior filmat de camera din dreapta pe înfrarosu. Segmentul urmator este filmat de camera stînga.
0.20 - Previous segment taken with camera on right in IR, next segment taken with camera on left.

Telescop Celstrom de 1000mm, a se folosi un extensor de 2x.
Celestrom 1000mm telescope, using 2x extender

Partea "rezolutiei" este utilizata pentru a rezolva /sublinia detaliile structurii obiectelor localizate pe infrarosu de catre localizator. Trebuie sa se foloseasca o ampliere optica de 150x. Acesta (segmentul), are o ampliere de 280x.
The "resolver" part is used to resolve the structure details of the objects spotted in IR by the spotter, around 150x optical magnification should be used, this one has 280x

Camera localizatoare cu lentila de 16-160mm de IR (infrarosu) de 950mm
Spotter camera with 16-160mm lens, 950nm IR filter


Localizarea executata de infrarosii, este partea critica în orice sistem optic duplu, deoarece este partea care se foloseste pentru a detecta obiecte mici în atmosfera. Fara un sistem de detectie, nu se poate vedea nimic. Amplierea optica pe localizator trebuie sa fie de aproape de 20x. Aceasta configurare particulara este de 26x.
Infrared spotting is the critical part in any dual optical system because it is the part used to detect small objects in the atmosphere, without detection nothing will be seen. The optical magnification in the spotter should be around 20x, this particular configuration has 26x.


0.40 - Video în viteza normala.
0.40 - Footage at normal speed.

A citi mai mult în /More available at

https://www.youtube.com/user/MiamiUFO/videos

Transcriber: Maya Benmergui


Traducere în limba română: Star  Child

Italiano -- JEREMY THOMAS -- Anomalia Lampeggiante 11/27/15 04:25 CET - video

 Anomalia Lampeggiante 11/27/15 04:25 CET


Please Translate and Spread.
Your translations will be posted here. 
Kindly send them to

luisavasconcellos2012@gmail.com


 Anomalia Lampeggiante 11/27/15 04:25 CET
Flashing anomaly 11/27/15 4:25pm EST


0.00 - Anomalia avvistata a IR infrarossi, notare le sue caratteristiche di pulsazioni lucenti.
0.00 - Anomaly spotted in IR, note its characteristic glowing pulsations.


0.20 - segmento precedente scattato con la fotocamera a destra in IR infrarossi, segmento successivo scattate con la fotocamera a sinistra.
0.20 - Previous segment taken with camera on right in IR, next segment taken with camera on left.


Celestron 1.000 millimetri telescopio, utilizzando 2x extender estensori
Celestrom 1000mm telescope, using 2x extender


La parte "risolutrice" viene utilizzata per risolvere i dettagli della struttura degli oggetti avvistati in IR dal spotter, intorno all'ingrandimento ottico 150x che deve essere usato, questa ha 280x
The "resolver" part is used to resolve the structure details of the objects spotted in IR by the spotter, around 150x optical magnification should be used, this one has 280x

Macchina fotografica con obiettivo 16-160mm Spotter, filtro IR 950nm
Spotter camera with 16-160mm lens, 950nm IR filter

Riprese ad infrarossi è la parte critica in qualsiasi sistema ottico dual doppio perché è la parte utilizzata per rilevare piccoli oggetti nell'atmosfera, senza rilevamento nulla sarà visto. L'ingrandimento ottico nel spotter dovrebbe essere di circa 20x, questa particolare configurazione ha 26x.
Infrared spotting is the critical part in any dual optical system because it is the part used to detect small objects in the atmosphere, without detection nothing will be seen. The optical magnification in the spotter should be around 20x, this particular configuration has 26x.

0.40 - Video a velocità normale.
0.40 - Footage at normal speed.


Molti video disponibili a/More VIDEO available at
https://www.youtube.com/user/MiamiUFO/videos

Transcriber: Maya Benmergui
Traduzione italiana: Mario

moon

x way live


“Glory to God in the highest, and on Earth

Peace, Good Will toward men.”

This Christmas, Give Peace.


logo

logo


Cameron Diaz UFOs


David Blackford //

rd


info@exopoliticsportugal.com

keshe

Dennis


PLEASE SIGN THIS PETITION


Dennis Kucinich: No war with Russia


No to War, Hot or Cold, with Russia
11,474
of 15,000 signatures


Any citizien of any country can sign this
petition


prg


Instructions HERE

The Congressional Hearing Initiative is a
project of
Paradigm Research Group


esoteric


SUBTITLES IN ENGLISH, ESPAÑOL, PORTUGUÊS

Click upon the circle after the small square for captions

SOCPOR OVNILOGIA

OUR FAMILY OF THE STARS

UFO VIDEOS